Saturday, June 23, 2012

Week 25 or Another Pants Bag

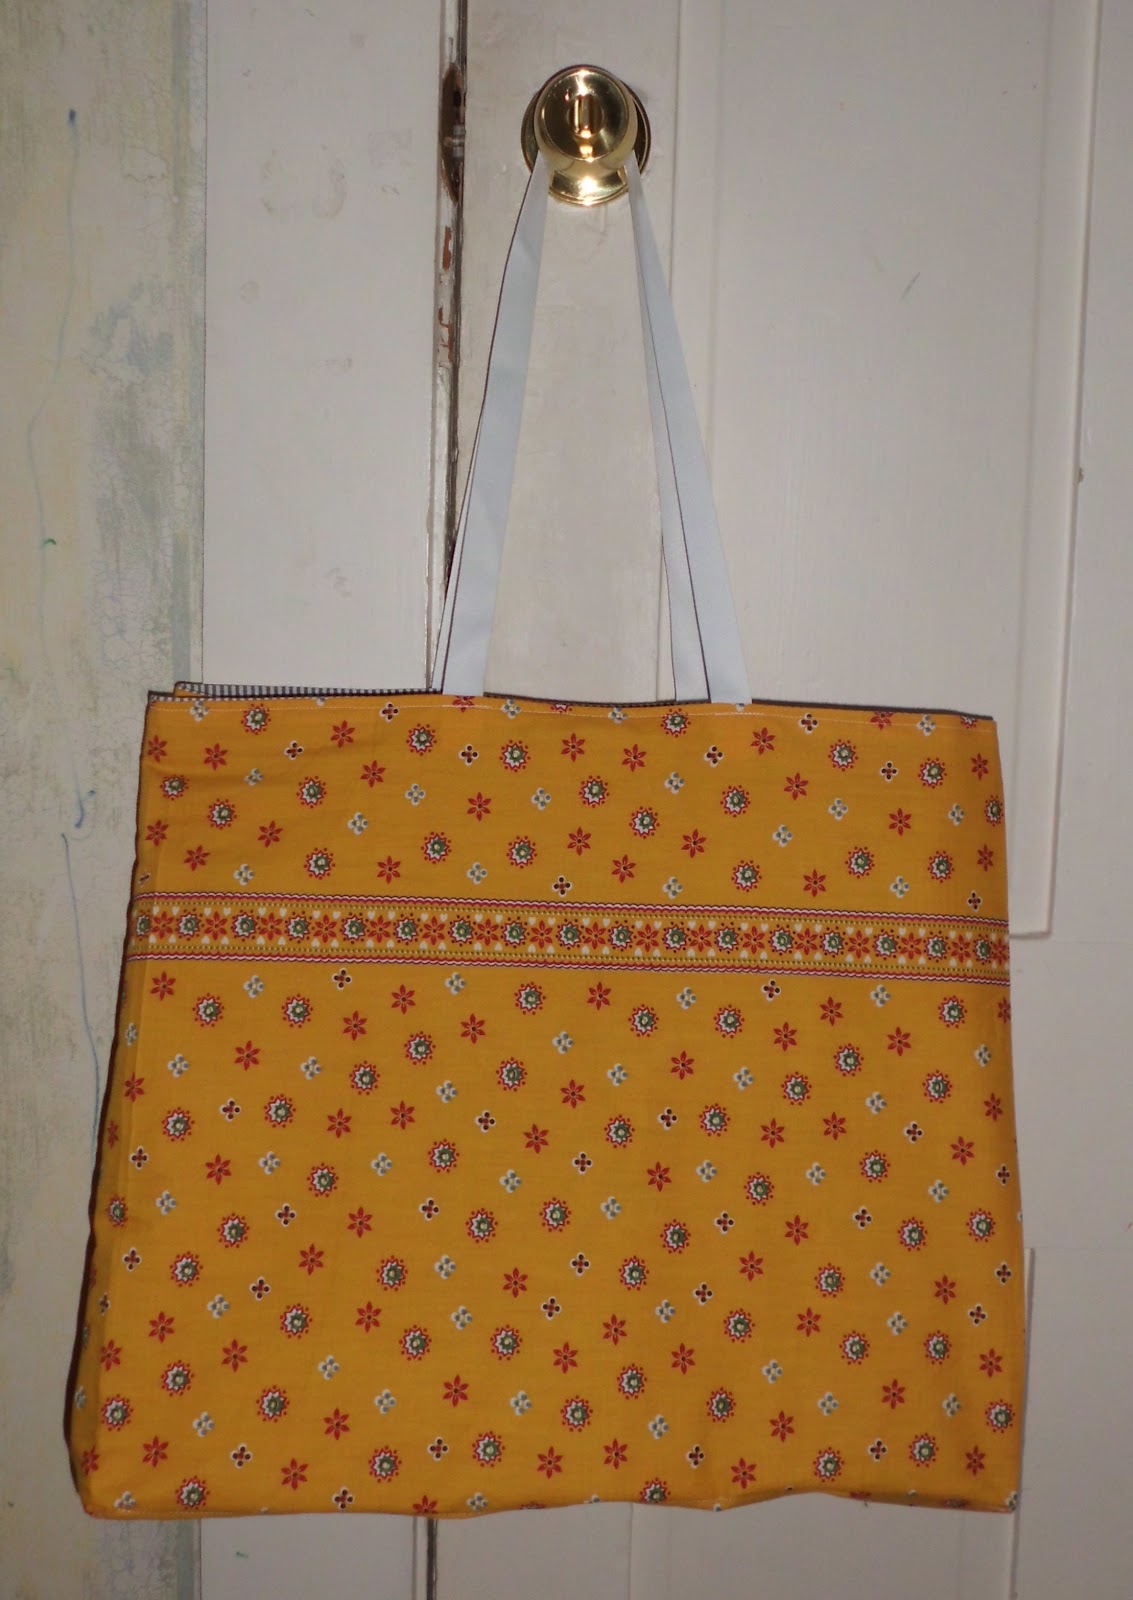
Once again my goal of getting rid of fabric has been thwarted by the failure of fabric elsewhere in the house. These shorts were super comfortable. The pockets were deep enough to hold all the crap I tend to carry around. So they needed a belt, were cut for a man, and did nothing for my figure. I'm generally not the kind of person who cares about that sort of thing. I even put up with the fraying hem for a while. And tolerated the paint stains. But at some point I need to admit that I'm an adult, a mom, and there's no need to look like a poor college student any more. Especially when your kids go to school on a college campus. So off to the scrap pile they went while I took a trip to the classy consignment store for some fresh capri's I can wear like a real mom.


After the shorts had spent several weeks on the pile, I had a morning with a rare combination of time, motivation and space on my desk for my sewing machine. I made 3 bags in an effort to avoid dealing with the real crises in my life. Some people turn to chemicals, other to shopping, but it was too early in the morning for shops or bottles, so I made stuff. The other 2 got posted last week. This week you're left with another pants bag. I love the reactions of the grocery store baggers when they realize you did not leave your clothing purchases in the grocery bag. I find the thought of putting your butt-enlarging groceries in your  old pants. I prefer the khaki-weight bags to the denim ones. They're lighter and more flexible. The denim is heavier to carry but still won't stand up on its own. And these look like I pantsed a Target employee.

Saturday, June 16, 2012

Week 24 or The Broken Shade

The cord went on the roller shade in my bedroom last week. After sleeping with the light coming in the window for 4 days, I put up another roller shade. The kind that goes "fwap fwap fwap" when you pull it down really far and let 'er rip! Very bachelor pad, but it works for us.

The old shade was a nice thick fabric, a bit off-white with age, but no rips or major stains. Luckily I saw the potential in it before it made it to the trash barrel. I also found washing instructions when I unrolled it all the way. As it turns out, you can disassemble the whole shade, launder the fabric, wipe down the plastic and put it all back together. You just can't replace the cord. Well, I suppose I could have, but I'd been looking for an opportunity to get rid of that shade since shortly after we moved in.

I made one small, lunch size bag. Which I don't have too much use for, but I'm sure my younger daughter will find some stuffed animals or toys to tote around in it. (So I thought, but it's just the right size and sturdy enough to hold a ream of resumes, a bottle of soda and a banana.) I was going to incorporate the flat plastic pull bar from the bottom as a handle. It turned out I'd need to redo the hem that was already there, so I just sewed on a plain handle.

It looks narrow, but that's only
because the bottom is nearly square.
After making such a small bag, I had lots of fabric left over. I have a large tote with my husband's company logo on it. It's quite serviceable as a swim bag, but it's cotton canvas and if you set it on a wet pool deck, everything inside gets soaked and the bag takes for... ever to dry. I'd been mulling over the idea of making a replacement out of the laminated cotton I bought with the intention of making lots of reusable snack and sandwich bags. I couldn't find it when I had the inspiration, and now I had this thick, plasticy shade material which would do just perfectly. Except that it's off-white and our beaches are definitely tinged with black from the coal-fired power plant in town. Whatever.
The bottom section is tucked into the side seam.
Note the W shape.


The fabric goes from top edge to top edge, with no seam on the bottom to let in water. The box bottom is made by just tucking in the bottom section and sewing the sides straight down. It gives an odd sort of triangle, but it's very efficient. I've seen it on a couple of nice-ish bags, presumably because it's really easy to make the triangles the same size and it doesn't add another step to the construction. It's genius whether you're a Chinese sweat shop or a harried seamstress at home. You fold the fabric into a "W"shape along the side seams. The top of the W is the top opening of the bag. The bottom is the bottom edge. The inner peak is the center of the bottom. The height of the inner peak is half the depth (front to back) of the bag. By varying the total height, the peak height and their relationship, you vary the height and depth of the bag.

Not much of a tutorial, but I made the bag and there's still something to look forward to.

Saturday, June 09, 2012

Week 23 or Book Bags

This is a set of two bags inspired by two blogs.

One is Make It Do, which is built around the premise of "use it up, wear it out, or make it do." She has posts about making things, be they food or fiber, and doing things with her family and friends, be it enjoying the outdoors or reading a great book. Recently she made book bags for her kids' teachers as end of the year presents. She had her daughters embroider their teacher's name on a strip of fabric and then she worked it into a book bag. Her son must not be into embroidery because his teacher got stars on her bag. They are very practical, appropriate and hopefully unlikely to end up in the trash next year when someone gives them another. My father was a teacher for 30 years. I have witnessed the rotation of the #1 Teacher mugs. It's not a pretty sight.

The other blog is The Purl Bee. It's not on my daily rotation yet, but maybe it will be. I referenced her tutorial last week, having found it just after posting a bag that could have been made using it. Someone at Craft Gossip must follow her, because her last two posts were both on there. She gives instructions on how to make a lined bag.

Everyone on Facebook is posting about the end of the school year, either that it has already passed or the anticipation. Last year we waited for ever to get out of school. We had about 52 snow days to make up and the school department was negotiating with teachers as to whether they'd rather give up April vacation or summer vacation. We ended up in class until June 30th. This year it's only the 20th. As a stay at home mom, summer vacation is a mixed blessing. It's nice not to have the daily hassle of getting the kids up and out the door and all the other school related minutiae, but now I have 10 weeks of "I'm bored" to look forward to. OK, 8 weeks because they'll be in camp for 2, but still. I'm not rushing the end of school.

So it's early June and while I've been very good about helping out on field trips and PTC stuff and district turnaround issues, I haven't really made anything for the teachers themselves this year. And there's this blog monster to feed, too. Each classroom at the girls' school has a bag. I have no idea what's in it, but they're all the same and the classes are rarely without them. Sometimes the teachers carry them and sometimes it's the students.

I made new ones with the teacher's name embroidered on them. Not heart-melting embroidery done by the hand of a thankful child, but rainbow machine embroidery, just because I can. I put on short handles as well as a long strap. I had thought it would be a shoulder strap, but I pulled an Alexa and just used what was on hand without measuring. So they're really long and can be used across the body like a messenger bag. Except that they've got a portrait orientation instead of landscape. Oh well. Those teachers are smart and can figure it out. Plus I'll be around if they want alterations.


Each bag is lined. One with the embroidery of the teacher's name that didn't turn out well and was oriented in the wrong direction anyway. The other with some lovely butterfly material. The long straps are anchored with more of the same, and I even managed to get the stripes to match up, which pleased me immensely. That little thing sticking out is my label. Even after 22 bags, I still forget to put the labels in the optimal position.

On top of being sturdy and a practical size, they're machine washable and can be used about town if the teachers decide not to replace their standard bags.

Have a great summer vacation, whenever it comes. I'll still be here behind the sewing machine and computer, when I'm not at the playground, beach, museum or library with the kids.

Saturday, June 02, 2012

Week 22 or The Mondriaan-Ikea bag


Years ago, I got some upholstery fabric at Ikea. I made a dress for my older daughter and kept the rest. It reminds of the mid/late-career work of Piet Mondriaan, which I love. I just learned there's a whole museum named after him in Amersfoort, the city of his birth, where I happen to have a very visitable cousin! If you're looking for a collection of his works that spans his entire career, check out the Haagsgemeentemuseum, one of several well-curated collections in The Hague. I'm pretty sure they don't let the war criminals wander the museums unsupervised.

I think this is the first time I've actually planned ahead and gotten started on a project well before Friday morning. Woohoo! Also the first time I've really matched up the stripes. It's amazing what you can do when you've got a box of pins and aren't afraid to use them. I even went all-out and lined the thing, too,  in red, to match the handles.


I wanted to make the bag similar in size to a large grocery bag, just shorter. But the  material had a little curve in it that would have meant making it significantly narrower or shorter. So I stuck a pocket over the hole. Which then inspired me to put a pocket on the inside. In a contrasting color.

So after getting started early, I still finished it up on Saturday morning, with one kid curled up in bed and the other asking me which filly collectible is my favorite from each family. I did come out of it with a very sturdy reversible bag with little pockets on the sides and a nice stiff layer to keep the bottom from collapsing completely.

In construction it's exactly the same as the other reversible bag, but the handles are shorter and the materials are both stiffer. And I had to piece together the red side because I'd cut bits and pieces out to make poodle skirts and armhole facings already. You can just barely see a bit of seam at the lower left corner. The other side is rather more obvious with its seams.

I can't wait to take it to the Farmers Market in 2 weeks. Just not to the garden. Which is a mud pit right now. My poor strawberries. But I'm sure the slugs and snails are loving it!

Update: Someone else posted a tutorial on how to make a lined bag with a pocket! Here it is.

Friday, May 25, 2012

Weeks 20 & 21 or More Shirt Bags

It's been a busy 2 weeks. We had a big birthday party last weekend, complete with homemade piƱata and bean bag toss. Each of those took several hours of work. Not to mention the shopping, invitations, keeping track of everything and trying to talk the girls out of adding yet another complicated activity to the schedule. In the end, we did not have the multi-level jump pad set up, just a couple of little trampolines. Which the guests didn't seem to mind. Add in the drawing board / water balloon target Dad, and everyone's happy. The treasure hunt ended up being plastic coins and rings scattered on the grass by my kids, but again only a few of the older kids commented on how it wasn't much of a "hunt." This week I've been trying to recover, but a very cute school choral concert and plans for a popsicle stand have taken up a lot of time.


I did find a shirt half taken apart already, so I started with that. I gave  away my favorite shirt bag to a grocery store bagger, so I wanted to see if I could make another just as good. As before, I used the body for one bag and the sleeves for another. The body bag folds up for storage and closes with a cuff. I attached the cuff to the side with the button placket, so now it doesn't work for closing the top when it's in use, but it holds it closed better when it's rolled up. It was handy to be able to shut the bag, but I was tired of having them get untidy in storage. I'll let you know how annoying that ends up being. If it's really bad, I can just add a button to the other side and call it a day.

I decided not to add fabric to make the sleeve bag bigger. It was going to be a quick and dirty lunch-size bag, but I ran out of time to finish it in one sitting. So it sat for a day, along with the hem scraps, and inspiration struck. I trimmed the hem section to about 3" wide. I set the sewing machine for "stun" (aka increased thread tension and stitch length to maximums) and turned it into a ruffle. I was going to turn the top edge of the bag to the outside, but the sleeve placket then showed and looked bad. So I used the shiny white webbing to hide the raw edge and for the handles. I made a ton of the ticking stripe handles already, so you'll see them in future bags. 

As with most of the bags on this blog, the handle straps are tucked into the hem on the inside. That way there are no raw edges to deal with. The handles end up being stitched in twice, so they're quite sturdy. And if you have a key clip that's the right size, you can attach it there. It may not look as sturdy as a box with an X, but I have not run into any problems yet and it's a lot quicker to sew. 

Now off to make a chocolate cream pie with Oreo crust (chocolate, chocolate, chocolate, the recipient said when asked if she'd prefer this to a graham cracker crust), attempt to catch my layout in trapeze class, get the girls from school, run the popsicle stand and take them and a friend for swimming and pizza before I collapse in an exhausted heap.

Saturday, May 12, 2012

Week 19 or Reversible boutique bag

No long story of my life this week, but I am proud of the bag. At last, an intentional bag finished on time.

There are a couple of lovely consignment stores downtown, and they like to wrap things up nicely, maybe to make up for the fact that you're buying second hand, but more likely because they really like clothes and they treat their customers well. I feel guilty every time they wrap something in pretty tissue paper only to have me shove it in the plastic bag I carry around in my pocketbook. I also don't like taking another giant sturdy paper bag, because I have a whole closet full of them already.

So I took one of those bags and used it as the pattern for this one. I was going for a bag that would look good being carried to the limo by the bellhop at the Plaza. A sleek black lined with a Lily Pulitzer print might have been more appropriate, but this is what I had on hand, and I think it works well enough.

I used some sturdy black ticking for one layer and fresh yellow quilting weight cotton for the other. There's a layer of painted canvas sewn into the bottom to stiffen it and all the layers are sewn together to keep them from shifting and to make turning the bag inside-out easier. The handles are a shiny webbing that looks good either way. I might use a double layer of grosgrain ribbon next time, just to have something wider and more colorful.

Wednesday, May 09, 2012

Week 18 or Last-minute gift bag


At some point, I was making enough bags that I felt compelled to write down dimensions. Finished, fabric and handle dimensions. What I assumed I'd remember was how to assemble these cut items into a finished bag. Alas, I made an ass out of u and me by sewing the gift bag sideways. The box of Harbor Sweets chocolates still fit, and nobody said anything, so I guess my ass is covered.

Yesterday I had the privilege of being at a party for library construction. I used to work at the Massachusetts Board of Library Commissioners. I bet you didn't know there was a state agency that dealt with libraries. Or a federal grant program that funds things like homework centers and construction. Well, Massachusetts has one of the best, and I was lucky to work there helping administer those grant programs, with an amazing crew of women (and a couple of decent guys, too) at a critical time in my life.

I had been out of college enough years that I should have had a career plan going, but I didn't. I was young enough that I should have had a full set of parents, perhaps even grandparents. But that ended. These women (and men) gave me the support I needed to get through that. (My mom had been a librarian for a short time. She had an MLS and even was the director of a small rural library. But her opinions got the better of her and she couldn't quite keep her mouth shut around the board of directors, so she found another career to pursue. But we kept going to our local library.) They were the mothers I needed when my mother was no more.

There I was, a child with so much to offer, but very little confidence and even less direction. This crew, several of whom are still on the job, took me in and they keep on saying nice things about me, even 15 years later. They encouraged me to take a course on industrial design. (My marker skills can still attest to that.) They got me interested in how buildings work and made me think I might like to be an architect. (I don't really, but I have a better understanding of public building design. Chances are, if you can't find the bathroom, it's because the place is poorly laid out, not because you're a moron.) I learned from them how to run a grant program and they will be there as I move into my first year chairing a grant committee. They're decorating my children's school library with their excess ALA swag posters. Even the ones who came on board after I left have been kind and generous beyond their pay grades. In short, I can't thank them enough for what they've done and who they are.

I really should have planned ahead and made a bag last week. I really should have gotten Patience a present before the morning of the party. I really should have had it wrapped before I had to leave for the party. But I didn't. Oh well. Move on. Work with what you have. Which is a sewing machine, friends who pick up random supplies while they're looking for things for their classroom, and neighbors who sell off exorbitant lengths of fabric for a song. So I made this little sideways bag to put the box of chocolates in, and it went over well. In the making, I was reminded of the first such bag I gave away as wrapping for a present. Mary Litterst, wherever you are, I hope you are still enjoying many a fabulous lunch in a fancy bag.


Sunday, April 29, 2012

Week 17 or Braided Handles

Years ago, before I had kids, I did yoga every week. Sometimes even twice! I went so far as to make yoga mat bags to sell at the studio. I even sold a few. I went out and bought material to make more. I cut out parts and finished the edges, did all the simple stuff short of committing to putting together the bags. I think the teacher still has a half dozen that didn't sell before I moved out of town, the studio moved and we fell completely out of touch.

I still have several sets of material that never got sewn up. This week, I was thinking of making one of the many patterns I've bookmarked from my web crawlings. Then life got the better of me and I ended up wracking my brain trying to think how not to make another plain old bag with webbing or matching fabric handles. Or worse yet, another t-shirt bag. Which seem like a cop-out, in addition to not getting rid of any fabric.

The girls are off at a birthday party right now with Dad. As usual, I got tasked with wrapping the present. Instead of reaching for the paper, I reached for the fabric which spills forth from my closet shelves. A pretty, thin, cotton print with pink and blue flowers and green leaves on a white background that barely peeks through them all. I was going for a Japanese look, for the Furoshiki effect. The sellers claim it's eco-friendly, but in my mind that only applies if you're not BUYING MORE STUFF!!! And no way am I shelling out $16+ when I have fabric and a sewing machine with a rolled hem foot. So I took my length of this fabric and cut off a few inches from one side to make it a square. Then I hemmed it and wrapped up the present.

So I'm here, alone in the house at last. You're thinking I get right to business making my bag. Ha! I grab a slice of chocolate chip sour cream cake (trade for an earlier bag) and watch a few minutes of a Sunday afternoon PBS cooking show. Some guy making meringue tubes with 5 raspberries just so and a spoonful of raspberry sorbet. They take like 40 hours from start to finish. I'll file that one away for when I live in the dessert and the kids are off in college.

I know I want to use the scrap of flowered furoshiki to make the handle. It's so thin that it needs help to be up to the task. I debate doubling it, adding a layer of plain webbing in the middle. Nah. I go for a braid, since it's just wide enough for three strips that will go through my 1" bias tape maker and just long enough for cutting in half and making two handles.

Then I look at the yoga mat bag bits. Brown corduroy, tan denim, maroon with elephants. At last I spy the black windowpane check. It's rather thin and probably would not have made a good mat bag, but it was a present and you don't just throw away fabric. Well, its moment in the sun has arrived. The black is a nice foil for the spring-like handles. I was really happy to find that the edges were all finished, so I didn't have to sew French seams or break out the borrowed serger again. Attached to it were a rectangle originally destined to become a water bottle pocket, and a black circle that was to be the bottom of the mat bag. I put the circle back on the shelf and decided to add a little inner pocket to an otherwise standard grocery bag. If you're not picky about wrinkles, you can turn it all inside out and stuff the bag into the pocket. I would include a picture of that, but I just spent 10 minutes ironing the edge into place and I'm not about to waste that time.

All in all, I'm happy with the way it all turned out. The only thing I don't like is that the windowpanes are a little wider than they are tall. Which is only because I used it with the selvedges running around the bag instead of top to bottom. If that doesn't bother you, it's all yours. The finished bag is 10" x 5" x 13" high. A little smaller than my other grocery bags, but still large enough to hold more than Market Basket baggers ever put in a plastic bag. And as Edward Humes, author of Garbology, said in his interview with Terry Gross, in response to the question "paper or plastic?": ""The correct answer is neither, if you want to have the best solution." This one is light and thin enough to stuff in your backpack or large purse.

Saturday, April 21, 2012

Week 16 or More t-shirt bags

I hope this doesn't become the "What Crazy Shirts Did We Get This Week" blog. My husband works as a computer programmer. Clearly his co-workers' computer skills have not expanded to include photoshop or any sort of graphic design. This shirt was what the team had made for themselves. Sight unseen, my husband thought it would be fun if we all had one! Now we each have a shopping bag.

Here's my original t-shirt bag post. And here's the second version. Let's hope I don't have to resort to this again.

Saturday, April 14, 2012

Week 15 or Aunt Edna's Couch


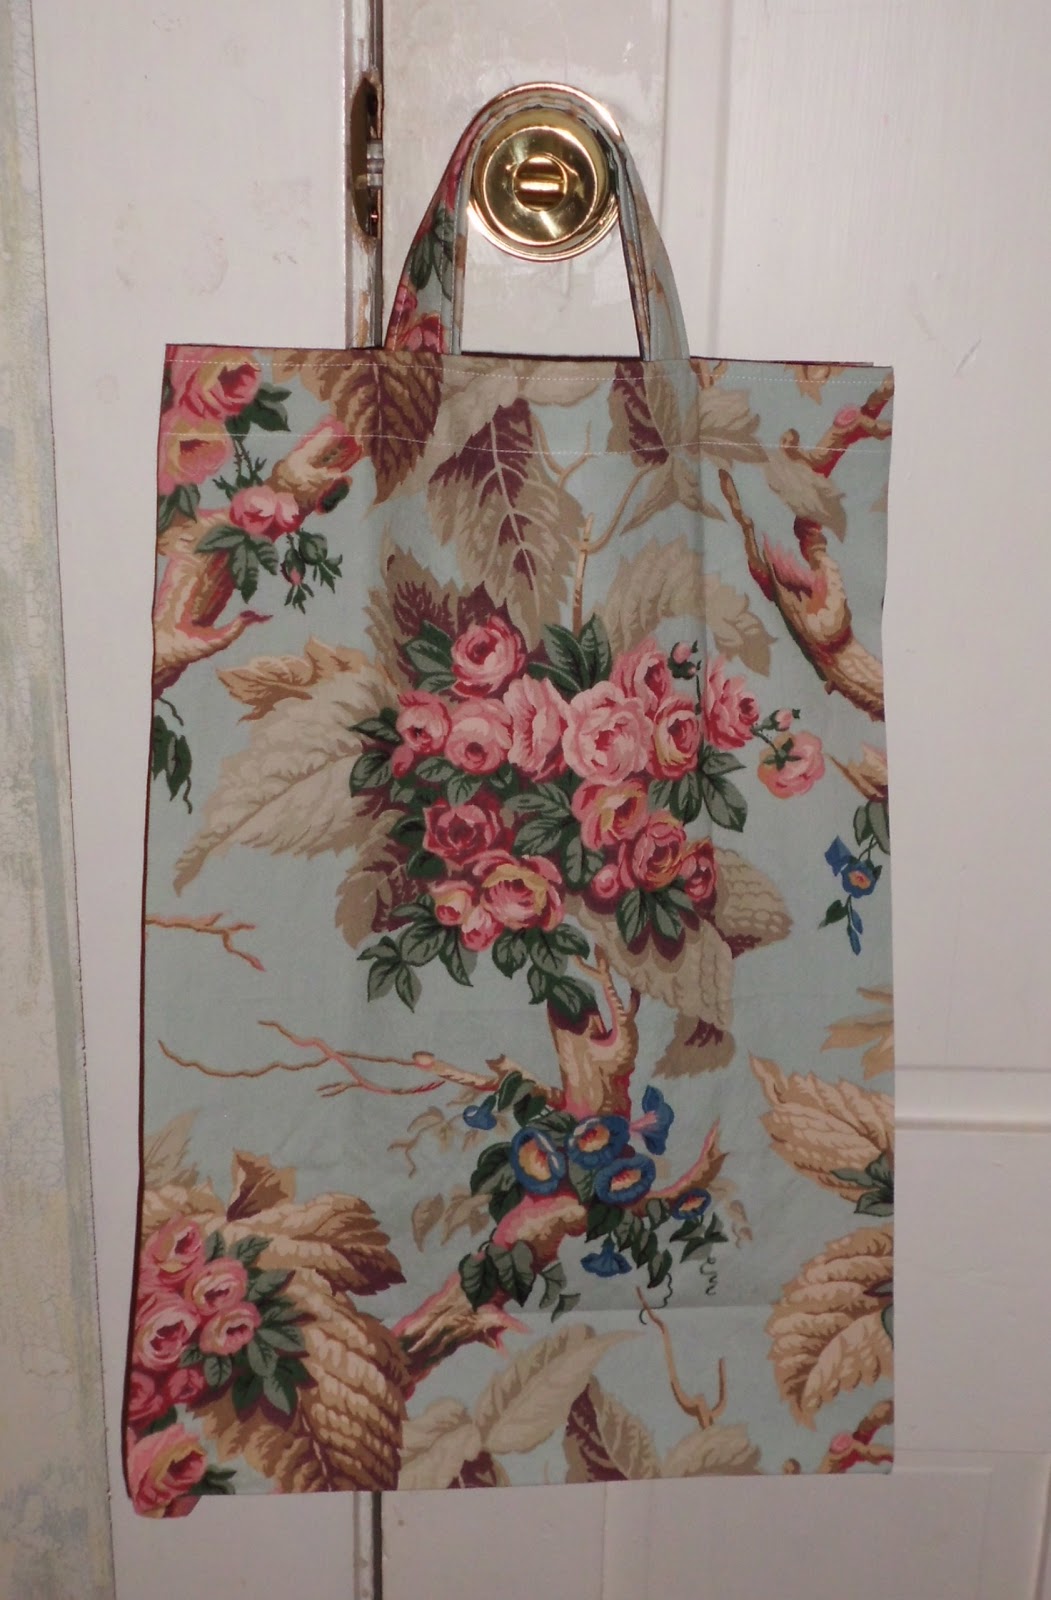
As promised, a bag that looks like it would blend right in with your Aunt Edna's couch. No need to all shout at once, there are a dozen more bags' worth of this fabric waiting for a purpose.

It's a standard grocery bag, with thicker handles than the last one and a flatter profile. I like the way the roses lined up nicely in the middle of the bag. That was completely accidental and made me very happy when I noticed it. If you look closely, you'll see that it worked out on both sides!

Happy Orthodox Easter to one and all. I spent a lot of time making bread for that this week and last. We have a tradition of sending a loaf of it to my mother in law and godmother in law. Normally I'll find or create a box to mail it in, but I didn't have time this year. Luckily, I did have some bubble wrap, the two lovely bags from last week, and a big roll of plain paper. They should arrive today, just in time.

Coming up is school vacation week, which isn't nearly as much fun when you're a parent, but I'll get to see some other parents I haven't seen in a while, so that will be nice. If the kids cooperate. Which they do from time to time.

Friday, April 06, 2012

Week 14 or the Easter bags

About a year ago, I got a bunch of material at a yard sale. A home decorator was clearing out half her house and was selling off bolt ends. I got some red ticking that got made into a Christmas tree skirt this past December, to replace the length of burlap that had been doing the job. And some black ticking. About 7 yards of robin's egg blue woodland floral print cotton that I think should have been named Aunt Edna's Couch. Bonus: it was labeled as 3 yards, but was actually closer to 7! And this lovely pastel green plaid that just screams Easter to me.

It matches the nasty wallpaper the
former owners used in my sewing room.


Without further ado, I give you two basic grocery bags. I didn't measure the corners for the box bottoms, so the bags turned out a little narrower and deeper than I'd wanted. The material is light enough to take anywhere and strong enough to carry 2 gallons of milk. There's enough material left to make three more, but they'll have to have webbing handles.

Monday, March 26, 2012

Week 13 or The Broken Towel Bar

Towel bar and 26"x37" fabric

Once again, inspiration strikes from the materials on hand. We had a cheap towel bar that had fallen down one time too many. So I bought a new one and had to find something to do with the old one. The brackets got tossed and the bar got cut in two and became the handles for this bag.
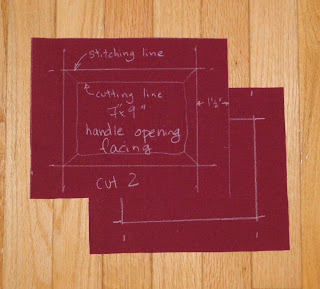
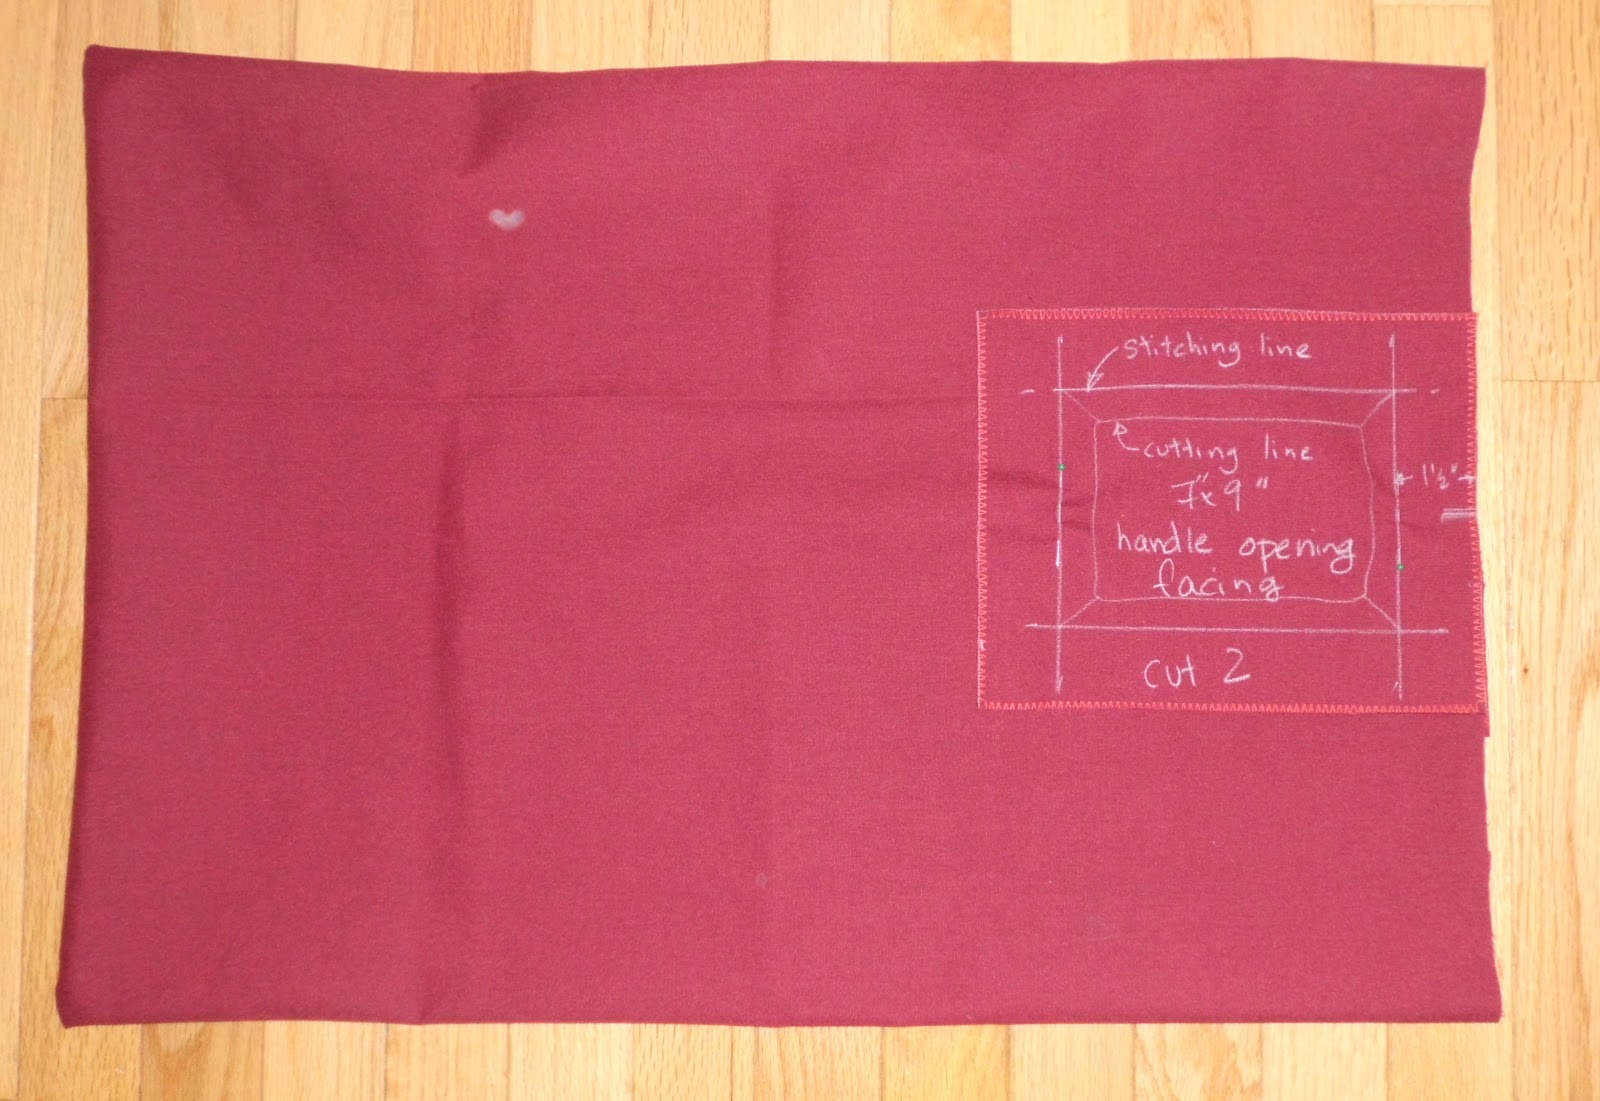
Handle opening facings
I aimed for a 12"x 6"x 18" tall bag. I cut one large rectangle, 26"x 37", and two small rectangles, 7"x 9", to face the handle opening. Once I actually put the bag together, I realized they should have been 9"x the width of the bag (12" in my case). The towel bar was about 19" long, so I cut it in half, getting two 9.5" pieces. My bar was wood, which made it easy to cut, but you could use a metal bar too. Or you could go crazy and buy a dowel. I do suggest looking around the house for something first, though. I've got my eye on the girls' Tinker Toys and sparkly magic wands. You might have a pointer, broom handle, wooden spoon... Just look.

Welcome back. What did you find?
Fold the body in two and stitch around 2 sides 
I figured I'd need a hole about 4" wide and 3" deep to fit my hand and the bar. Doubling the 3" to get 6", I drew a 4"x6" rectangle 1.5" from the edges of the facing. That gave me my stitching line. If your bar or hand is much larger or smaller, you  may want to adjust that measurement. Since you'll be using a 9"x12" rectangle, draw the 4"x 6" one in the center of that, with the 4" end along the LONG edge. Put a little mark in the middle of the long edge so you can line it up with the middle of the bag body later. (I haven't done that yet, but you'll see the mark later.)

Now it's time to start sewing. Fold the large piece of material, the body of the bag, in half with the right (pretty) sides together. You'll have a 26"x 18.5" rectangle. Sew down the long edge and along the short edge to the fold. Zigzag along the raw edges to keep them from fraying.
Pin the facing to the center of the top edge
Turn the bag right side out. Mark the midpoints of the open edges. Finish (zigzag stitch over) one long edge and the two short ends of the facing pieces. Pin the facing pieces to the open edges. Line up the unfinished edge of the facing with the upper edge of the bag, making sure the marks line up, too. All four marks should be in the same place so your handle openings will line up. Pin it all in place. Sew along the stitching line.


Cut the handle opening
Cut out the inside of the rectangle you just sewed. Leave about 1/2" of fabric. Snip right into the corners so they'll be nice and sharp in the end.

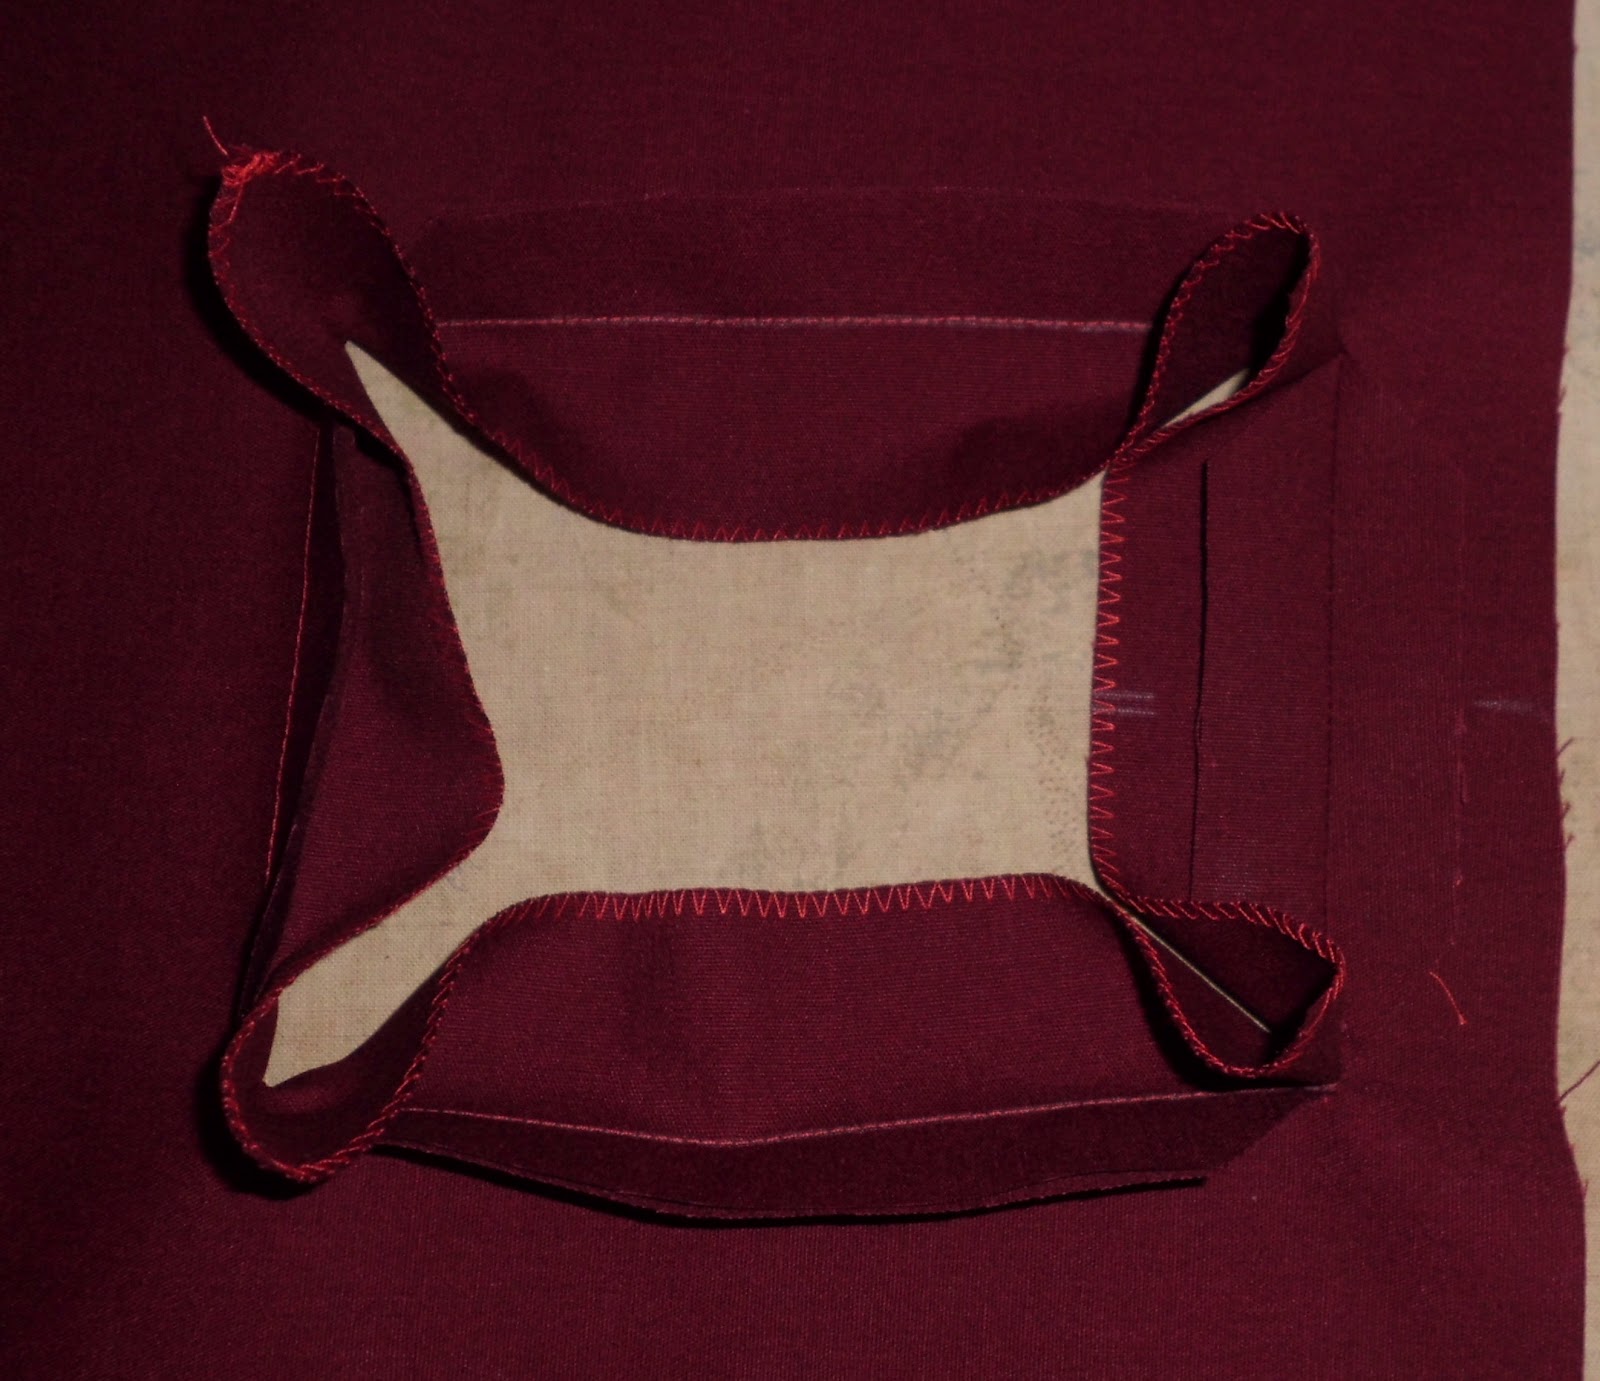
Pull the facing through and press it
Turn the bag inside out and pull the facing to the inside of the bag. Dust off your iron and press the seams open one at a time. Then pull the whole facing nice and tight and press it all again.

Topstitch around the opening so it stays nice and neat forever and ever. That just means sew around the opening, really close, like 1/8"close, from the edge of the opening.
Topstitching


Box corner
Finish (zigzag stitch) the top edge, being sure to catch the edge of the facing as well. You could turn a hem here, but I got lazy.

Make the bottom box corners that will give your bag some dimension. I was aiming for 6", but I didn't measure and they ended up being a little bigger, making the faces of the bag a little under 12" wide. Whatever you do, make sure both sides are the same. Also make sure you line up your bottom seam with the side seam on one side and the side fold on the other. That way you'll know everything's square. See how nicely perpendicular the seams are in this picture?

We're getting close to the end and every stitch from here on out will show on the outside. Fold the top edge of the bag towards the inside. Line up the two short edges of the handle opening and pin them together so nothing moves. Stick your handle in its' final position and pin around it. You want to stitch a channel that's exactly as wide as you need. Too small and you won't be able to get the handle back in. Too big and it will fall out when you go to pick up the bag. Take the handle out and sew where you've marked. Sew all the way from one opening to the next. Do this on both side of the opening. Then sew all the way around, on the level of the topstitching around the opening. That helps the facing keep from flapping open and falling out of the bag. Lastly, find the corners of the top of the bag. They should line up with the box corners you made at the bottom. With the handle removed, press those folds nice and crisply. Then sew right on them, from the top edge to the lower row of topstitching. That will help keep the handle from sliding out of position and dumping your carton of eggs on the sidewalk. It's not right up against the ends of the handles, so they can still be removed for washing (or repainting!). Insert the handles and go shopping!


Friday, March 23, 2012

Week 12


The second bag for Martha, this time 1939.


This one is my second iteration of the red and white 1475 bag from a few weeks ago. The sail is much softer and the top material is much stiffer, so this one does not stand up on its' own. It's probably also not as water-resistant, but it does have some spiffy topstitching along the upper edge.

 I also figured out how to get the rope through the grommets more easily. You put tape on either side of where you want to cut the rope. Then you melt the raw end so it doesn't fray. I had been leaving too long of space between the tapes.

At the boat shop, where I got slightly thinner and more colorful rope for next time, they have an awesome heat cutter. There's a heated flat blade and you just pull the rope down on top of it and it melts right through like a hot knife through butter. They use a wide piece of tape and just cut straight through rope and tape in one shot. Some day... for making butter slices when I open a fancy B&B.

Wednesday, March 14, 2012

Week 11

Martha gave me two sails at the start of last summer. I said I'd make her a bag as a birthday present. This one was her special favorite sail, so I didn't want to start hacking away at it without a little experience first. I made another bag from her "scrap" sail a couple of weeks ago. Then I realized how gigantic this logo was. Not so big when it's all the way across the harbor, but quite large when you translate it into a bag. So I went with a different design. The final dimensions of the bag are 18" wide, 23" tall and 9" deep. You can fit at least one sail in it and perhaps a small boat, too.
There are a couple of seams on the back from the sail. I imitated the original stitching style of the sail in the topstitching. Upholstery thread to match the durability of the fabric. More grommets and seaworthy rope for the handles. I considered using light blue for the side and bottom panels, but didn't have anything that matched well and was wide enough, so I just went with a monochrome look.

Sunday, March 04, 2012

Week 10

The half-bushel bag. I love picking apples with the kids. Heck, I just love picking apples. It's nice to be out in the fresh air in the fall. The apples taste better than you'll ever get any other time or place. And you know exactly where your food is coming from.

The one thing I don't like about apple picking is the bags. In the case of our closest orchard, they're plastic, they come from China and the handle makes it nearly impossible to put anything but apples in them. It's fine for carrying a heavy load of apples, but you can't put anything big in the bag.


So I made one out of some flag material I picked up on Freecycle and the rope and grommets I've been using a lot of lately. I wanted to keep the handles in the same place and orientation, but make it possible to swing them out of the way to fill the bag. Sewing flat straps in place would mean the handles would always be a little bit in the way. Grommets and rope allow the handles to pivot out of the way. I measured how much rope I'd need to go from grommet to grommet and then added enough to tie the knots that secure the ends. A little fire, a pair of pliers and some heavy pulling and we were all done.


Saturday, February 25, 2012

Week 9

Another short post because of a crazy week. The kids were out on vacation this week, so we were out of town for 5 days.

The trapeze show went great. I did crash into the catcher on my first swing, but I caught both my tricks on my next 2 tries. Thanks to all who came out!

Especially to Amy, who gave me a big bag of big shirts to transform into bags for her school fundraiser. They're leftovers from printings gone by, so many of them are gigantic. Almost ridiculous for shopping bags. But then we got a couple of bags with take-out while we were away, so I used those to size these. It's kinda poetic that a XXXL shirt has been transformed into something to carry a pizza or a box of donuts. The red bag actually has 2 clementine crates in it and the blue bag has a 12" pizza box inside.

So while these might not net enough to send a kid to Europe, they're not completely useless.

Here's my original post on the t-shirt bag concept, with notes on making my version. And here's the tutorial I based it on.

Saturday, February 18, 2012

Week 8

Very short post this week. Must go shower before performing in a trapeze show tonight. Go TSNY!

I spent a fair chunk of sewing time making a horse costume for that. Just a tail, an embellished t-shirt and a headband with ears, but the little things always take more time than you'd expect. I wasted some sewing energy making a pair Colonial-era aprons and caps for a 3rd grade dramatic reading of the Declaration of Independence which ended up not needing costumes.


So today I dug into the actual sail for the second time. The first time was for a gift bag for a 5 year old. I grabbed the "5" off the sail and made a little drawstring shoulder bag. This time I went for a big round tote with a cinch top. I think you could fit a whole sail in that thing. Or a load of laundry.